So in this ERA of automation and integration where every user intends to automate the business processes, what can POWER PLATFORM and POWER BI do? That’s a big question which is answered by highlighting the capabilities of POWER PLATFORM below.
Quick Overview of Business Central !
Microsoft Dynamics 365 Business Central is a cloud-based Enterprise Resource Planning (ERP) solution that helps manage finances, operations, sales, and customer service. It integrates seamlessly with other Microsoft software such as Office 365, Dynamics 365, and Azure, as well as third-party software, to increase functionality, streamline efficiency, and manage various business processes.
What is Power Platform?
Power Platform is an intuitive and collaborative platform that includes several low-code tools to quickly automate processes and build apps for various use cases.
Microsoft Power Platform is a powerful suite comprising four key products: Power Apps, Power Automate, Power BI, and Microsoft Copilot Studio.
What role “Data Connector” plays?
Microsoft Power Platform utilizes connectors to integrate data from various platforms, serving as intermediaries between data sources and applications or workflows. These connectors facilitate the extension of business solutions across different platforms, enhancing functionality for users. They connect to two types of data sources: tabular and function-based.
Tabular Data Sources
A tabular data source provides data in a structured table format that can be directly read and displayed using galleries, forms, and other controls. Examples include Microsoft Dataverse, SharePoint, and Business Central. Power Apps can create, edit, and delete data from these sources, making them highly versatile.
Function-Based Data Sources
Function-based data sources use functions to interact with the data source, offering extensive actions such as sending emails, updating permissions, or creating calendar events. In Business Central, examples of these functions include approval processes.
Connectors: Bridging the Gap
Microsoft Power Platform offers more than 320 connectors to common data sources, divided into standard and premium categories. Standard connectors include SharePoint, Outlook, OneDrive, Dropbox, and Google Drive, while premium connectors, requiring additional licensing, include Business Central, Dynamics 365, SQL Server, Survey Monkey, and Mailchimp.
Custom Connectors
For more advanced scenarios, Microsoft Power Platform allows the creation of custom connectors. These can call publicly available APIs or any custom APIs hosted in the cloud. Custom connectors, once created, can be used across different application platforms, such as Power Apps, Power Automate, and Azure Logic Apps. This flexibility is especially beneficial when integrating Microsoft Power Platform with Business Central, enabling tailored solutions to complex business needs.
Steps to Integrate Power Platform with Business Central
Step 1: Set up a connection to Dataverse using Assisted Setup
1. Log in to your Business Central account as an administrator.
2. Search for Assisted Setup and select the relevant link.
3. Select the setup “Set up a connection to Dataverse”.
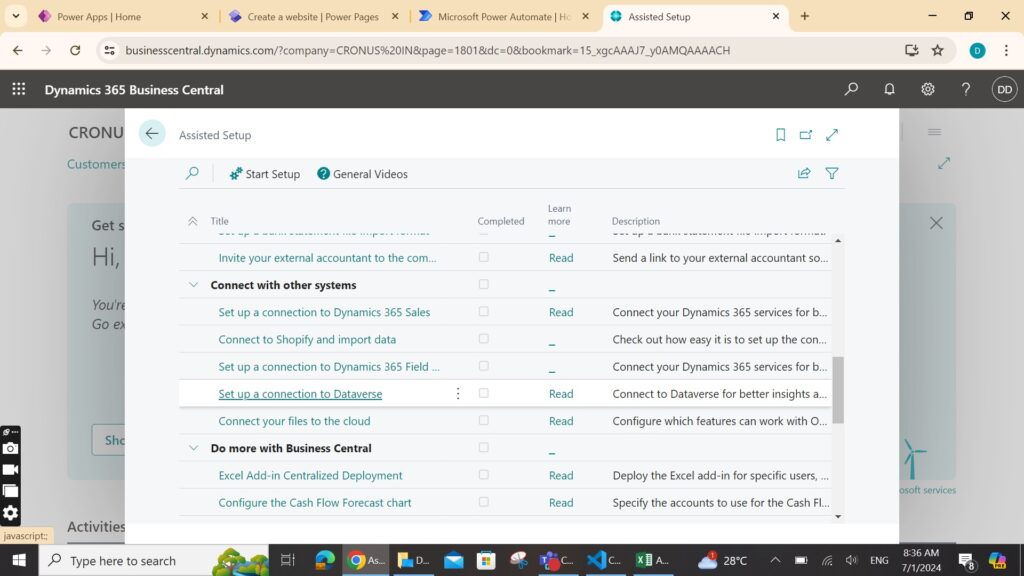
4. Enter your Power Platform environment details and select the entities to be connected between the Dataverse and BC.
5. A confirmation message and a link to the Data Integration page will be shown on the screen.
Step 2: Set up a connection to Business Central from Power Platform
1. Sign in to your Power Platform account and choose the desired component (Power Apps, Power Automate, or Power BI).
2. In the component’s interface, look for the option to add a new connection or data source.
3. In the field “Connection Type”, find and select Dynamics 365 Business Central.
4. Provide your Business Central account details and credentials.
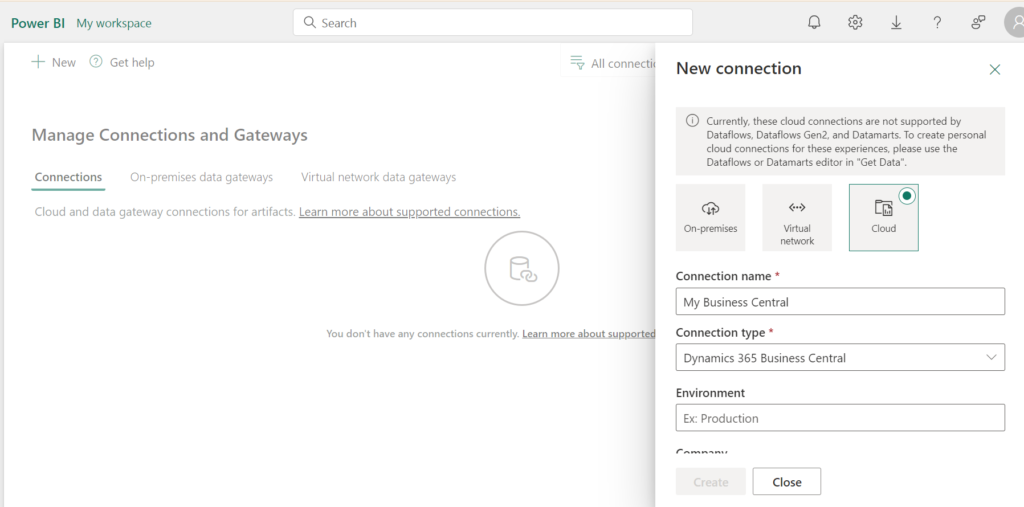
5. After the connection is established, you will see your Business Central data and actions available in the component’s interface.
Introduction to Power Apps
Power Apps is a comprehensive suite that includes apps, services, connectors, and a data platform designed to facilitate the creation of custom business applications. By leveraging Power Apps, users can swiftly build custom business apps that connect to various data sources, including Dynamics 365 Business Central.
Power Apps: Rapid Low-Code Development
Power Apps provides a rapid low-code development environment for building custom apps tailored to business needs. With its services, connectors, and scalable data service and app platform (Microsoft Dataverse), Power Apps allows simple integration and interaction with existing data. This enables the creation of web and mobile applications that run on all devices, bringing the convenience of app usage in daily life to the business context.
Types of Power Apps
Power Apps has two main types of apps: canvas apps and model-driven apps.
1) Canvas Apps
Canvas apps start with the user experience, providing a highly customizable interface. Users can drag and drop elements onto a blank canvas, similar to designing a PowerPoint slide, and connect to over 320 data sources, including Business Central. Canvas apps are ideal for creating task-oriented applications for web, mobile, and tablet devices. They extend the possibilities for customization, especially for task-specific scenarios, although they are not replacements for all Business Central customizations.
2) Model-Driven Apps
Model-driven apps start with your data model. They build upon the shape of your core business data and processes in Microsoft Dataverse, using forms, views, and other components. The layout is largely determined by the components added to the app, ensuring a responsive UI across devices. Model-driven apps follow a component-focused approach and do not require code, making them suitable for both simple and complex applications.
Power Automate Overview
Power Automate’s flows are constructed using triggers and actions. Triggers start the flows, while actions define the tasks that take place. Both business users and IT professionals can create these automations, boosting productivity throughout the organization. Typical use cases include automating data transfers, guiding users through processes, and connecting to external data sources.
Types of Flows in Power Automate
There are three primary types of flows in Power Automate:
1. Event-Driven Flows:
These flows are triggered by specific events and perform one or more actions. They are categorized as “My flows” (owned by a single user) or “Team flows” (shared ownership).
2. Business Process Flows:
Designed to augment the experience in model-driven apps and Common Data Service, these flows create guided experiences within model-driven apps.
3. Desktop Flows:
These robotic process automation (RPA) flows record actions performed on a desktop or web browser and automate these processes. Data can be passed in or out, automating even manual business tasks.
Creating Flows in Power Automate
Power Automate allows users to create flows in three basic ways:
1. Automated Flows:
Triggered by an event, these flows perform tasks automatically. For example, an automated flow can send an email notification when a new customer is created in Business Central.
2. Instant Flows:
These flows perform repetitive tasks with a single tap, such as registering the beginning of a workday for employees.
3. Scheduled Flows:
These flows perform tasks at specified intervals, such as sending a report via email daily, hourly, or at a specific time.
What’s Power Automate By the way?
When you sign into Power Automate, you’ll find several menus that help you manage and create workflows:
• Action Items: Manages business process flows and approvals.
• My Flows: Access your personal flows.
• Create: Start a new flow.
• Templates: Browse popular templates.
• Connectors: Connect one service to another.
• Data: Access entities, connections, custom connectors, and gateways.
• AI Builder: Add intelligence to your automated processes to predict outcomes and improve business performance.
• Solutions: Manage your solutions.
• Learn: Find resources to quickly get up to speed with Power Automate.
So it’s time for some “ACTION”. But what exactly is an ACTION in Power Automate?
An action in Power Automate refers to any ongoing operation or process you want to execute after a specific trigger. The Business Central connector offers six different actions:
1. Create record
2. Delete record
3. Execute action
4. Get record
5. Get record type
6. Update record
Using these actions, you can leverage all exposed APIs from Business Central.
Create a Power Automate Flow
Creating a Power Automate flow from scratch allows you to automate repetitive tasks and streamline business processes. Here’s a step-by-step guide to creating a flow that sends an email notification when the inventory for a specific item falls below a certain quantity.
Steps:
1. Sign In to Power Automate:
• Go to the Power Automate website and log in using your credentials.
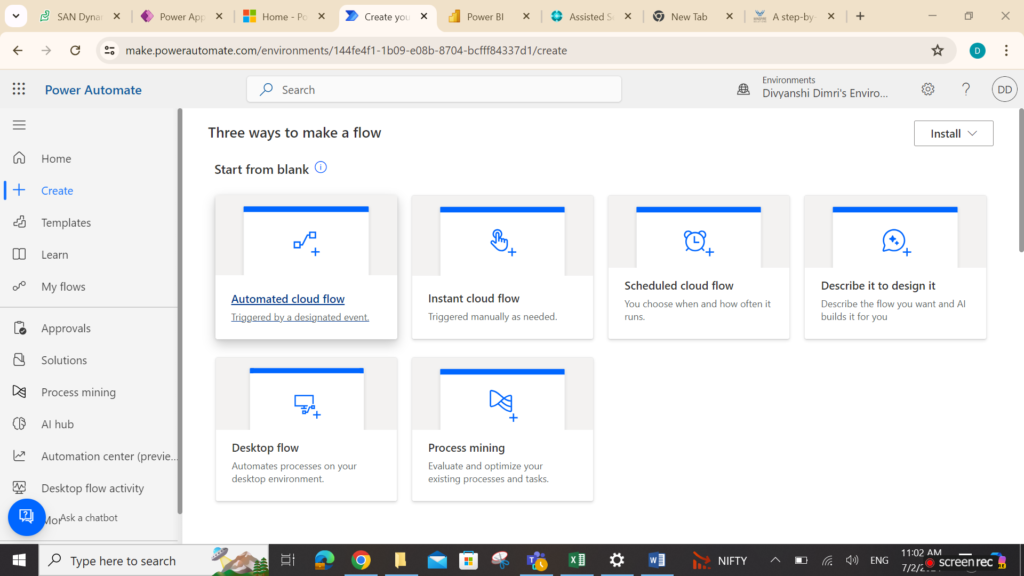
2. Create a New Flow:
• Select “Create” from the menu on the left.
• Click on the “Automated flow” tile.
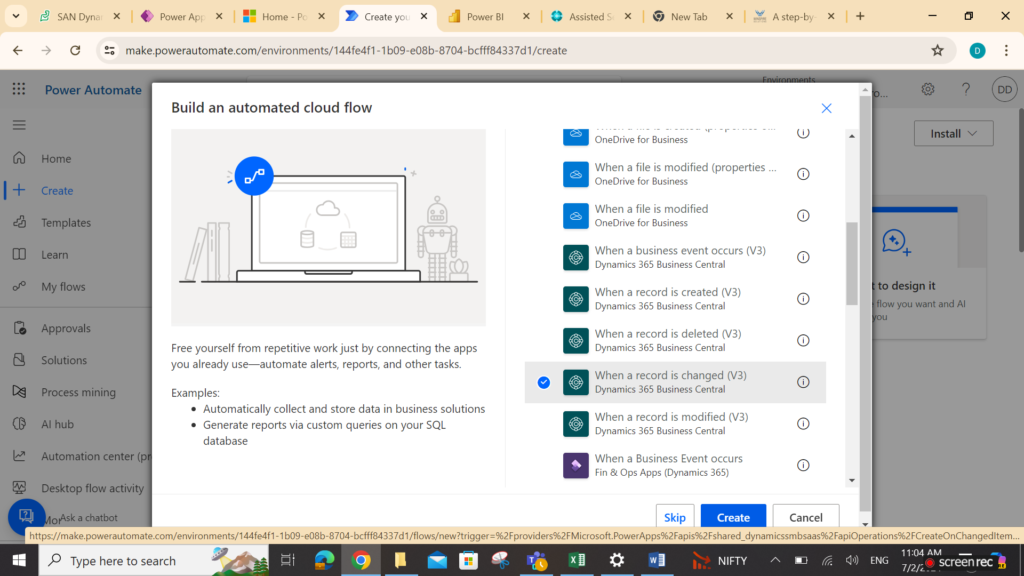
3. Specify an Event to Start the Flow:
• Enter a name for your flow.
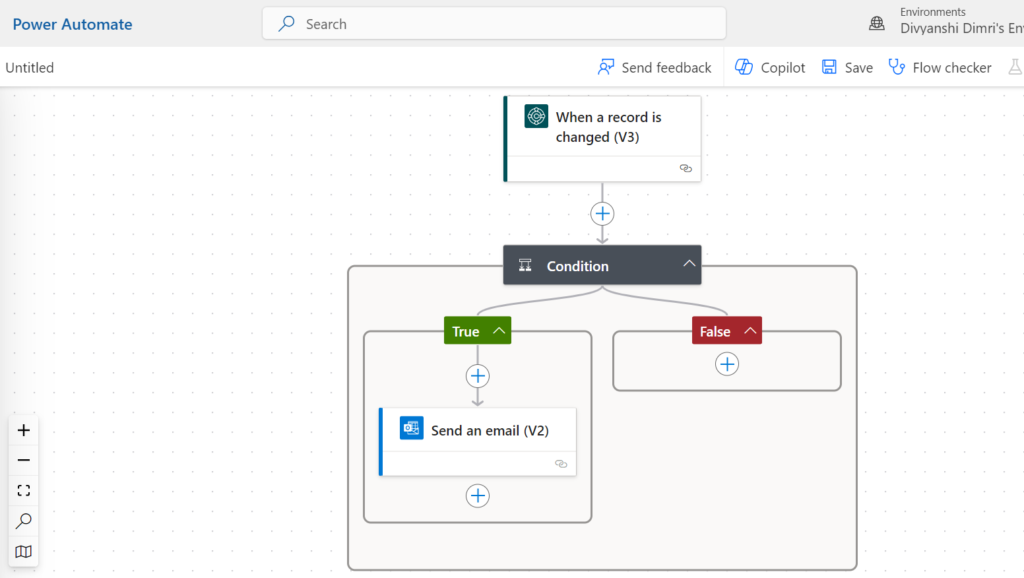
• In “Choose your flow’s trigger” field, select Business Central trigger.
• Choose the “When a record is changed” trigger for Business Central and click “Create.”
4. Configure the Trigger:
• The Environment name will default to “PRODUCTION.” Change it to “SANDBOX” if you are using a sandbox environment.
• Select the Company name from the drop-down list.
• In the Table name field, select “Items” since you want to check inventory levels.
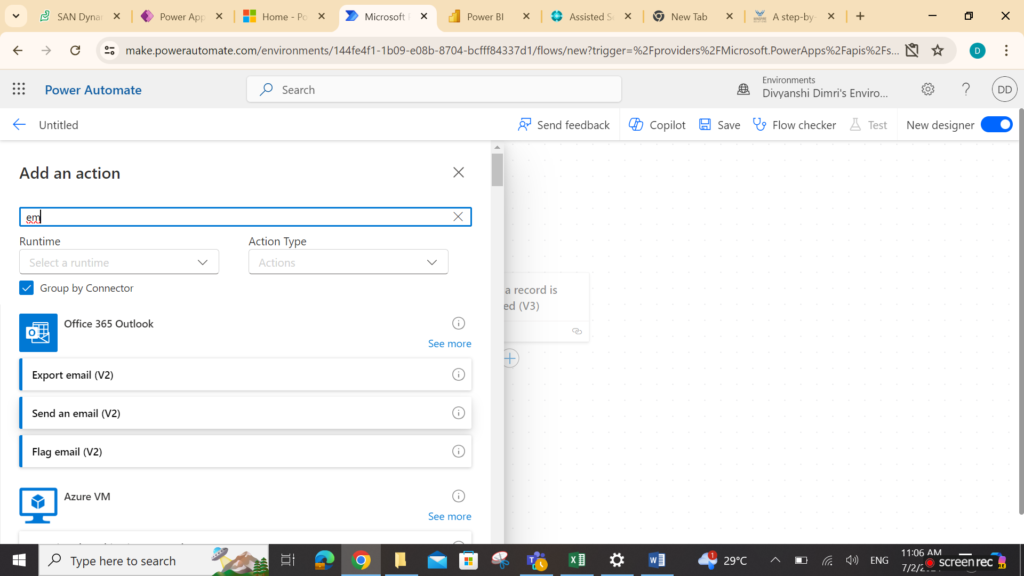
5. Add an Action:
• Click the “+ New step” button to add an action.
• In the search box, type “Email” and select the “Send an email (V2)” action.
6. Configure the Email Action:
• Fill in the required fields for the email action:
1. To: Enter the email address of the recipient.
2. Subject: Provide a subject line for the email, such as “Inventory Alert.”
3. Body: Write the body of the email. You can include dynamic content from the previous steps by clicking on the “Add dynamic content” button.
7. Set Conditions for Inventory Check:
• To ensure the email is sent only when the inventory is below a certain quantity, click “+ New step” and select “Condition.”
• Configure the condition:
1. Choose a value: Select the inventory field from the dynamic content.
2. Condition: Choose “is less than.”
3. Value: Enter the threshold quantity.

8. Complete the Flow:
• Under the “If yes” branch of the condition, add the “Send an email (V2)” action configured earlier.
• Under the “If no” branch, you can leave it empty or add other actions as needed.
9. Save and Test the Flow:
• Click “Save” to save your flow.
• Test the flow by making a change in the Business Central item record to see if it triggers the email notification.
Power BI with Microsoft Dynamics 365 Business Central
Integrating Microsoft Dynamics 365 Business Central with Power BI enables businesses to harness the full potential of their data. This integration allows for seamless data visualization and reporting within Business Central, helping decision-makers make informed decisions. This guide will walk you through the process of configuring web services in Business Central, adding Business Central as a data source in Power BI, and creating and displaying Power BI reports within Business Central.
Overview of Data Web Services
Web services offers a lightweight method to make application functionality accessible to various external systems and users. Business Central includes several objects that are exposed as web services by default, but you can also add and publish other web services.
Step-by-Step Guide to Setting Up Web Services in Business Central
Step 1: Create a Web Service in Business Central
1. Navigate to Web Services:
• Open your Business Central account.
• Go to the “Web Services” page.
2. Add a New Web Service:
• Select the “New” action in the ribbon.
• In the Object Type field, select either Page or Query (for Power BI integration).• Enter the Object ID of the Page or Query you want to publish.
• Provide a Service Name and select Published.
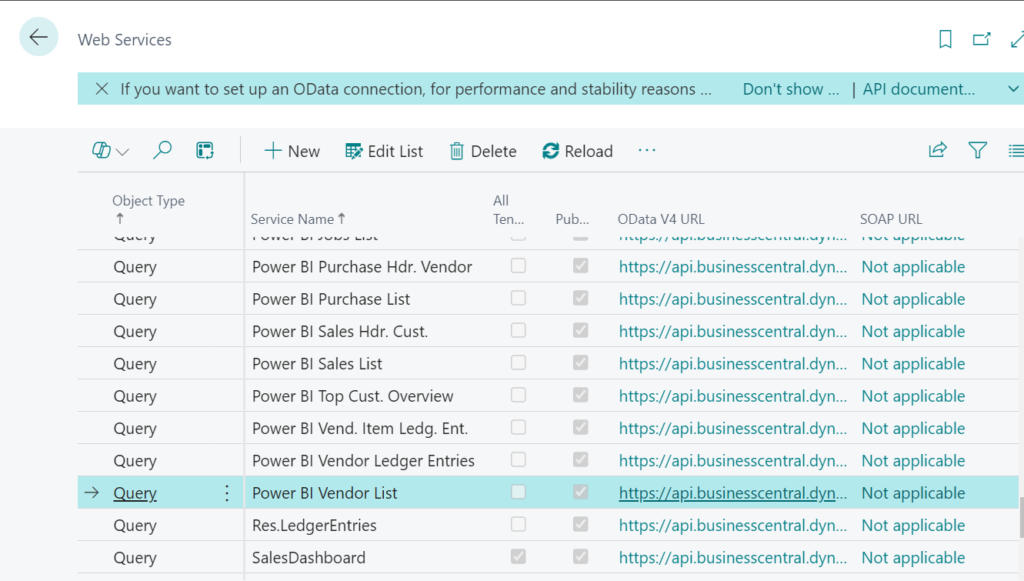
3. Verify Web Service Availability:
• After publishing, the web service will be available over the network.
• Verify its availability by entering the URL in a browser or using the OData URL, SOAP, or URL fields on the Web Services page.
Step 2: Add Business Central as a Data Source in Power BI
1. Connect to Business Central:
• Open Power BI Desktop.
• In the left navigation pane, select Get Data.
• Choose Online Services and then select Dynamics 365 Business Central.
• Follow the wizard to sign into your Business Central account.
• The wizard will display a list of available data sources from Business Central.
• Select the data you want to add to your Power BI data model and choose Load.
Setting Up Power BI in Business Central
1. Sign Up for Power BI: Ensure you have a Power BI account.
2. Connect Power BI in Business Central:
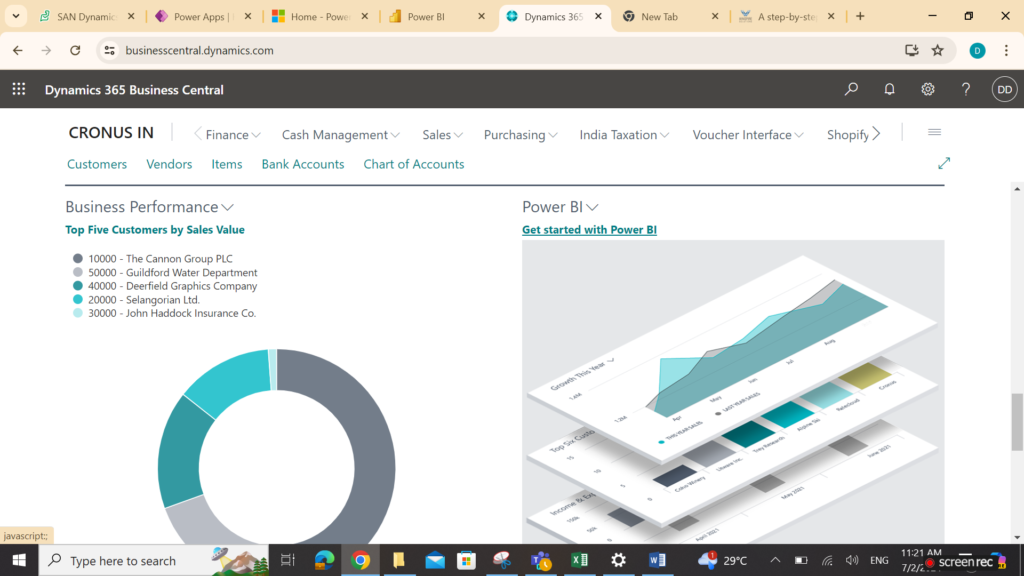
a. Go to the Power BI Reports part in Business Central.
b. Select “Get Started with Power BI” and follow the setup wizard.
c. Confirm your Power BI license.
d. A default demo report will be uploaded to Power BI.
3. Select Power BI Reports:
a. Use the “Select Report” action to choose reports from your Power BI workspace.
b. Enable reports to display on your Home page.

4. Get Additional Reports:
a. Retrieve reports from “My Organization” or “Services” in Power BI.
b. Create and publish new reports to your Power BI workspace.
5. Manage and Upload Reports:
a. Modify existing reports or upload new .pbix files.
b. Uploaded reports are shared with all users in the company.
6. System Requirements: Ensure you have permissions to required web services for data retrieval.
Creating Power BI Reports to Display in Business Central
Step 1: Create Your Report in Power BI Desktop
1. Select a Data Set:
• Ensure the data set contains information related to the list you want to associate the report with (e.g., purchase data for the Purchase List).
2. Define a Report Filter:
• Use the primary key (e.g., No. field) as a report filter.
• Drag the primary key and drop it into the Report Filter section.
3. Set Report Size and Color:
• Set the report size to 325 pixels by 310 pixels for proper display in the Power BI Fact Box control.
• Optionally, set a custom background color to match the Business Central background.
4. Save and Name Your Report:
• Include the name of the list page in the report name (e.g., “Vendor” for Vendor list reports) for easy identification.
Step 2: Display Power BI Reports in Business Central
1. Configure Reports:
• Open your Business Central account.
• Navigate to the Report Selection page under the Power BI section.
• Select the report created by you in the Power BI Desktop.
• The report will be displayed in the FactBox control on the relevant list pages.
Using Business Central Apps in Power BI
Step 1: Install a Business Central App in Power BI
1. Open Power BI:
• Sign into your Power BI account.
2. Get Data:
• Select “Get Data” from the bottom of the left navigation pane.
• From the Power BI or Business Central interface, navigate to the Report Selection page and select Service or My Organization.
• Choose the appropriate Business Central app (CRM, Finance, or Sales) and select Get it now.
Step 2: Connect the Business Central App to Your Data
1. Provide Connection Details:
• Under Apps, select the Business Central app and choose Connect.
• Enter the Company Name and Environment details.
• Sign in using your Business Central credentials.
2. View Dashboard and Reports:
• Once connected, a dashboard and all reports showing Business Central data will be added to your Power BI workspace.
Deploying Business Central Dashboards in Power BI
1. Open Power BI: Sign in to Power BI.
2. Get Data: Select “Get Data” at the bottom left.
3. From Business Central: Select the Business Central app from the Power BI Apps.
4. Connect to Environment: Enter your Business Central environment and company name.
5. Dashboards and Reports: After connecting, dashboards and reports will appear in Power BI.
6. Refresh Data: Set up manual or scheduled data refresh.
Viewing List Data in Power BI Reports
1.Create Reports in Power BI Desktop:
a. Ensure datasets are related to the list (e.g., sales data for the Sales List).
b. Use the primary key as a report filter.
2. Define Report Filter:
a. Set the filter to the primary key field with Basic filtering.
3. Set Report Size and Color:
a. Size: 325 pixels by 310 pixels.
b. Background color: FFFFFF (white).
4. Save and Test Report:
a. Include the list page name in the report title for easier selection.
b. Test the report in Business Central to ensure it displays correctly.
Conclusion
The integration of Microsoft Power Platform and Business Central has transformed businesses of all sizes and industries. Integrating these tools with Dynamics 365 Business Central opens up a world of possibilities, ensuring that business solutions are cohesive, efficient, and highly functional. An implementation partner like SAN Dynamics Technova may help to implement and integrate Power BI and Power Automate. Customers in developed countries like Australia, USA, United Kingdom have opted for implementing these applications for greater benefit. This has resulted in increasing their ROI and harnessing the potential of these applications, keeping in mind the low cost of maintenance.