Introduction
Configuring tax in Business Central for the USA requires setting up multiple components to ensure precise tax calculation and adherence to local regulations. This process involves defining sales tax areas, creating tax groups, and assigning appropriate codes to inventory items, customers, and vendors.
Key Components of Tax Setup
1. Tax Jurisdictions:
These are geographical areas with their own set of tax rules and rates. These can be countries, states, provinces, cities, or any other geographic entity that imposes taxes. You can define tax jurisdictions based on the regions where your business operates.
2. Tax Areas:
These represent the specific locations within jurisdictions where taxes are collected. Setting up tax areas allows the system to apply the correct tax rates based on the location of the transaction. It allows us to handle scenarios where different locations within the same jurisdiction have different tax rates
3. Tax Groups:
These are categories that group similar tax types together. They help in orgainizing and managing different taxes together, such as use tax, purchase tax and sales tax. It makes applying multiple taxes to a single transaction feasible. For example, non-taxable items can have a single tax group code.
Key Steps for Tax Setup
There are two ways to setup sales tax in Business Central, using Assisted Setup and by manually setting it up.
Assisted Setup
1. Select the “Set Up Sales Tax” assisted setup guide available in Business Central.
2. Follow the steps to configure sales tax information for your company, customers, and vendors:
a. Specify the accounts to use for sales tax on sales and purchases.
b. Specify the tax information for your area, such as city, county and state.
c. Set the name of the tax area specified above.
d. Choose whether to assign the new tax area code created to customers, vendors and your company.
e. As the last step, set the location filter for the customers and vendors to assign tax area code. For example, Miami’s tax area code should only be applied to Customers whose location is set as Miami.
Manual Setup
1. Tax Setup:
a. Search for “Tax Setup” and select the relevant link.
b. Fill the required sales tax information such as Sales and Purchase tax accounts, non-taxable tax group (if already created).
2. Tax Groups
a. Create tax groups to categorize inventory items or resources that share identical tax terms.
b. In the below example, Tax groups have been created, consisting of two distinct categories: the TAXABLE group and the NONTAXABLE group. The NONTAXABLE group is intended for items exempt from taxation, while the taxable group is designated for items subject to specific tax rates.

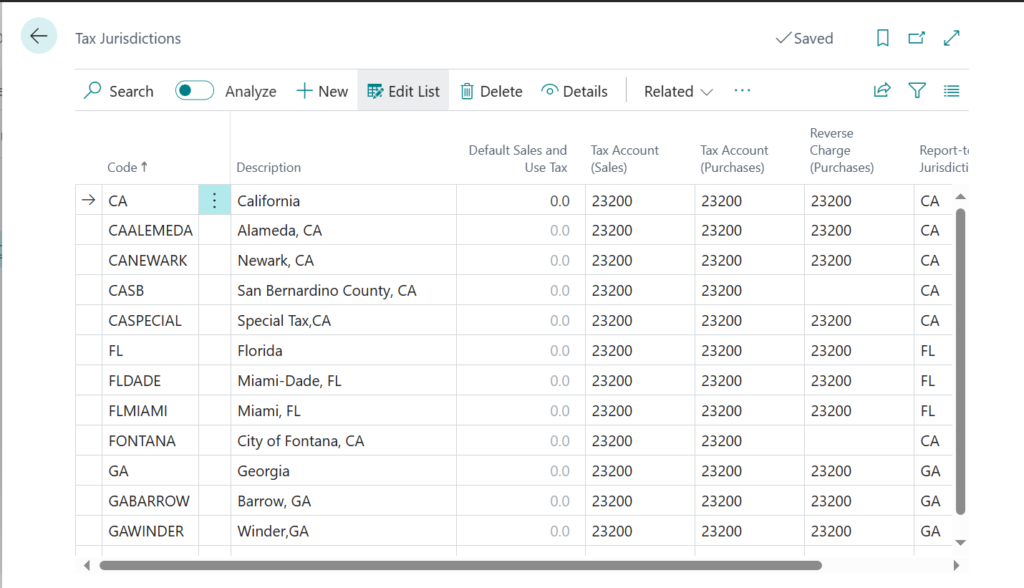
3. Tax Jurisdictions
Each tax area comprises multiple jurisdictions (e.g., city, county, state).
a. Navigate to the Tax Jurisdictions page in Business Central.
b. Create new tax jurisdictions by specifying the name and region.
c. Define the tax percentage for each jurisdiction.
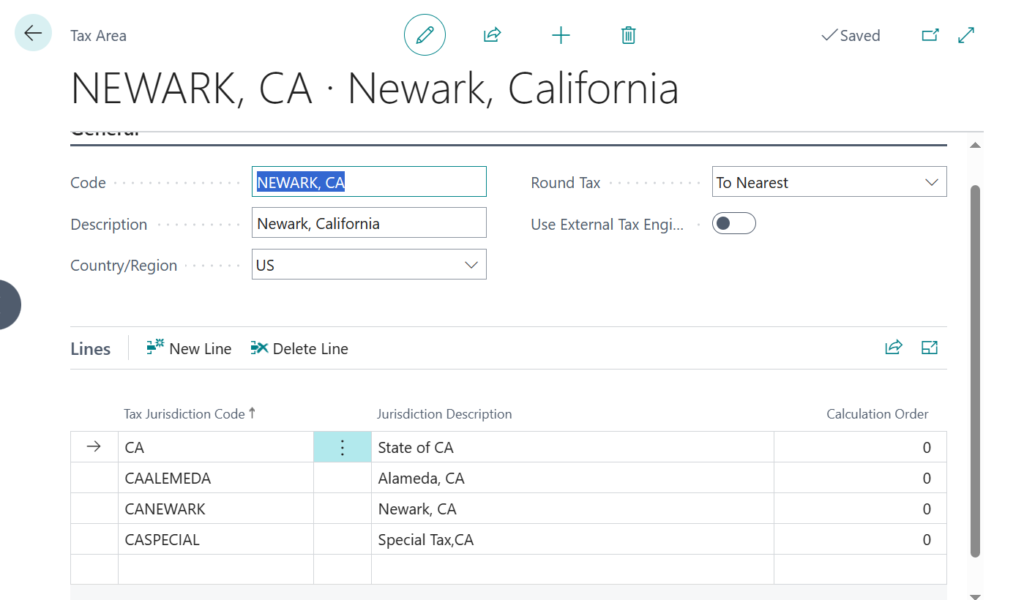
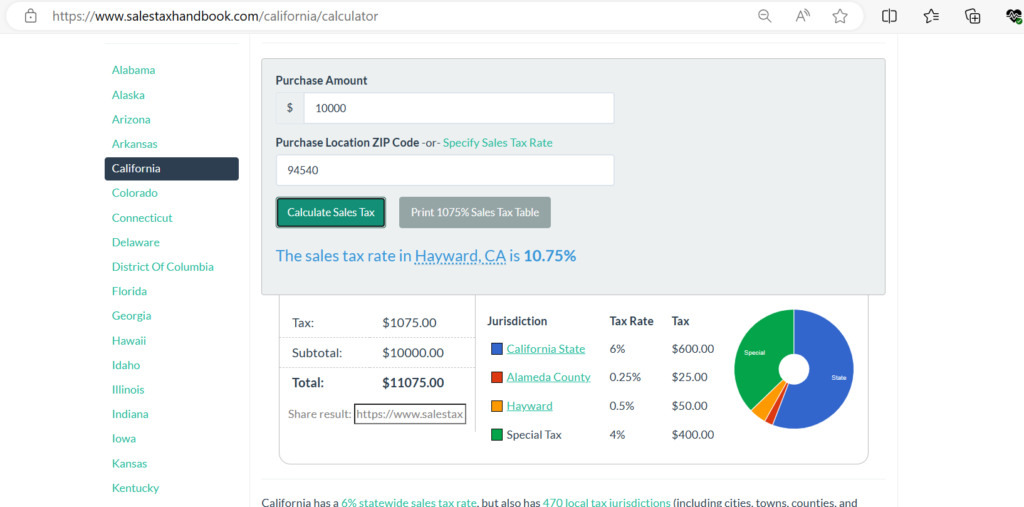
d. For Example: If the tax area is Newark, California, it will include the tax jurisdictions of Newark city, Alameda county, and California state.
4. Tax Areas
Define tax areas, which are groups of sales tax jurisdictions based on geographic locations.
a. Go to the Tax Areas page.
b. Create new tax areas and link them to the corresponding tax jurisdictions.
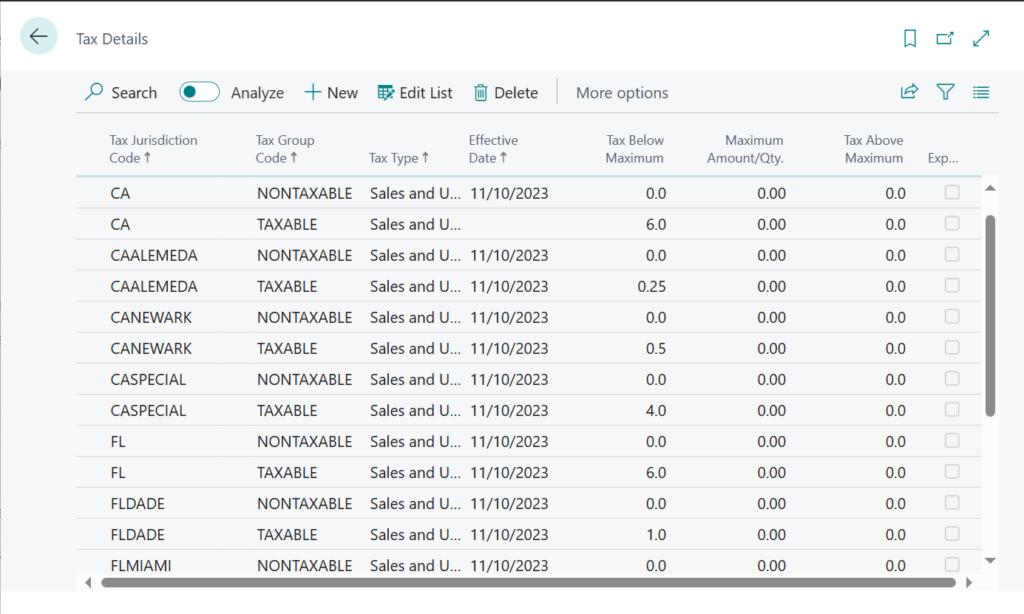
5. Tax Details
Use the Tax Details page to define combinations of sales tax jurisdictions and groups. Establish tax rates for different tax jurisdictions and item/service types.
a. Set the effective date field to specify when the tax will begin applying to documents.
b. Set the “Tax Above Maximum” and “Tax Below Minimum” to define the currency limits for taxes. If there are no limits needed, leave both fields at 0.0.
c. Mark the Expense/Capitalize check box for non-recoverable tax. This Indicates if the tax paid cannot be reclaimed.
Setting up Tax Details for Customer, Vendors and Items:
Customer/ Vendor:
1. Go to Customer List and open one of the Customer Card.
2. Under Invoicing FastTab, specify the following fields:
a. Tax Liable: Specifies if the tax should be applied to this customer or not.
b. Tax Area Code: Specifies the tax area this customer belongs to.
c. Tax Identification Type: Specifies whether the customer is a Legal Entity (organization) or a Natural Person.
d. Tax Exemption Code: Enter the tax exemption number for customers exempted from Taxes.
3. Note: Vendor Card contains only Tax Liable and Tax Area Code fields.
Items:
1. Go to Items List and open one of the Item Card.
2. Under Cost & Posting FastTab, enter the Tax Group Code field.
Additional Considerations
1. Exemptions and Reductions:
Some transactions may be exempt from taxes or qualify for reduced rates. In Business Central, you can set up exemptions and reductions by creating special tax codes and applying them to eligible transactions.
2. Tax Reporting:
Regularly review your tax reports to ensure accuracy. Business Central provides various tax reports that help you monitor your tax liabilities and ensure compliance with tax regulations.
3. Updates and Compliance:
Tax laws and regulations can change frequently. Ensure that you stay updated with the latest changes and update your tax setup in Business Central accordingly.
Business Central’s Capabilities and Limitations Related to Sales Tax
Capabilities:
1. Automated Tax Calculations:
a. Business Central can automatically calculate taxes based on predefined tax codes and jurisdictions.
b. The system supports multiple tax types, including sales tax, VAT, and GST.
2. Tax Reporting:
a. Provides built-in reports for tracking tax liabilities and ensuring compliance.
b. Reports can be customized to meet specific business needs.
3. Flexible Tax Setup:
a. Allows for the creation of custom tax codes, groups, and jurisdictions.
b. Supports different tax rates for different regions and product types.
Limitations:
1. Complex Tax Scenarios:
a. Business Central may struggle with extremely complex tax scenarios, such as those involving multiple overlapping jurisdictions or unique tax rules.
b. Specialized tax software like Avalara or Vertex might be necessary to handle these complexities.
2. Real-Time Updates:
a. Business Central does not automatically update tax rates based on changes in tax laws. Users must manually update tax rates in the system.
b. Third-party software can provide automatic updates to ensure compliance.
3. Exemption Management:
a. While exemptions can be handled, managing them efficiently might require additional customization or integration with specialized software.
Example of the tax setup:
1. Shown below is the sales order, along with the tax calculation for reference.
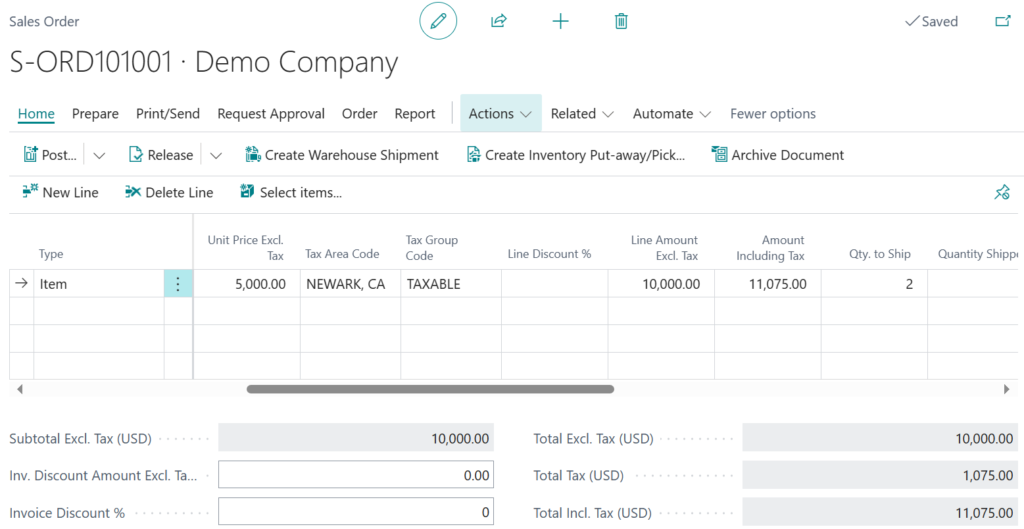
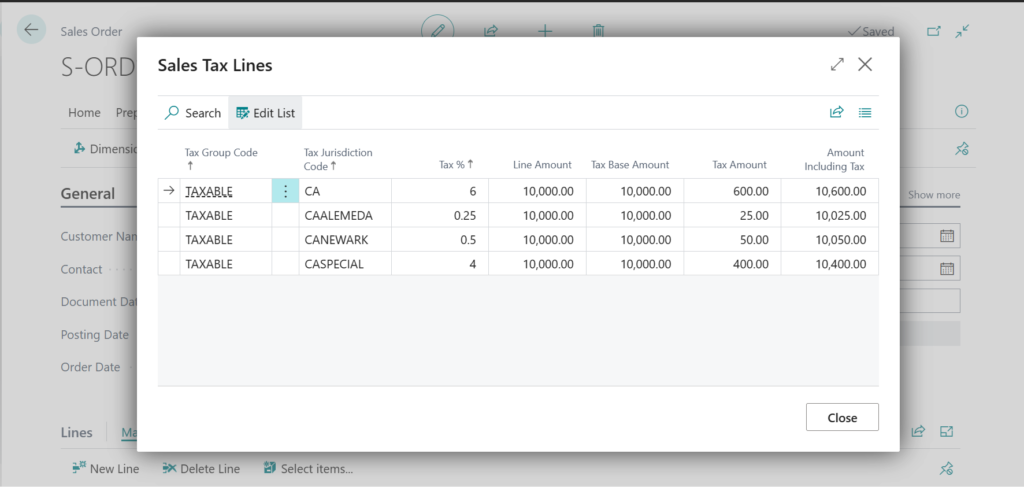
2. In the example provided, the tax amount in the company’s sales order matches precisely with the sales tax computed in the illustration below.
Setting up taxes in Business Central requires careful planning and attention to detail. By understanding the key components and following the steps outlined in this guide, you can ensure that your tax setup is accurate and compliant. This will not only help you avoid potential penalties but also streamline your financial reporting processes.
You can partner with SAN Dynamics Technova for setting and configuring the USA Sales Tax setup in your organization and harness the power of Microsoft Dynamics 365 Business Central.